Introduction
Bearish candle patterns are price-action signals formed on candlestick charts that suggest sellers are gaining control and prices may fall. Traders use these patterns to spot potential reversals or continuation moves and to time entries, exits, and stops. This article explains the most reliable bearish candlestick patterns, how to read them, and practical rules for using them in real trading.
What a bearish candlestick pattern tells you
A bearish candlestick pattern typically shows that sellers overwhelmed buyers during the session(s). That may mean:
- A reversal is starting after an uptrend (most useful).
- A pullback in a downtrend (if seen inside a larger down move).
- Momentum is shifting toward sellers (watch for confirmation).
Always combine patterns with trend context, volume, and support/resistance a single candle rarely tells the whole story.
Key bearish candle patterns
1. Bearish Engulfing
Structure: A large bearish candle (red/black) completely engulfs the body of the previous bullish candle (green/white).
Why it matters: Shows a strong reversal of short-term sentiment buyers were dominant, then sellers quickly took over.
How to trade it: Prefer after an uptrend; wait for the next candle to close lower (confirmation). Place stop-loss above the engulfing candle’s high.
2. Evening Star
Structure: Three candles a large bullish candle, a small indecisive candle (doji or small body), then a large bearish candle that closes well into the first candle’s body.
Why it matters: The small middle candle signals indecision; the final bearish candle confirms a shift to sellers.
How to trade it: Best on daily charts after a sustained rally. Confirm with volume decline on the middle candle and increased volume on the bearish candle.
3. Dark Cloud Cover
Structure: After a bullish candle, a bearish candle opens above the prior high (gap up) but closes below the midpoint of the previous bullish candle.
Why it matters: Buyers tried to push higher but sellers pushed price back down aggressively; a warning sign of a reversal.
How to trade it: Confirmation on the next candle is useful; stop above the high of the dark cloud candle.
4. Shooting Star
Structure: A single candle with a small body near the session low and a long upper wick.
Why it matters: Price tested higher levels but got rejected, leaving a long shadow sellers showed strength at higher prices.
How to trade it: Most reliable at the top of an uptrend or near resistance. Wait for a lower close next session.
5. Hanging Man
Structure: Similar to a hammer but appears after an uptrend: small body at the top, long lower wick.
Why it matters: Shows that sellers pushed price down during the session; buyers recovered but selling pressure is present.
How to trade it: Confirm with a lower close next day. Use tight stops because hanging man can be ambiguous.
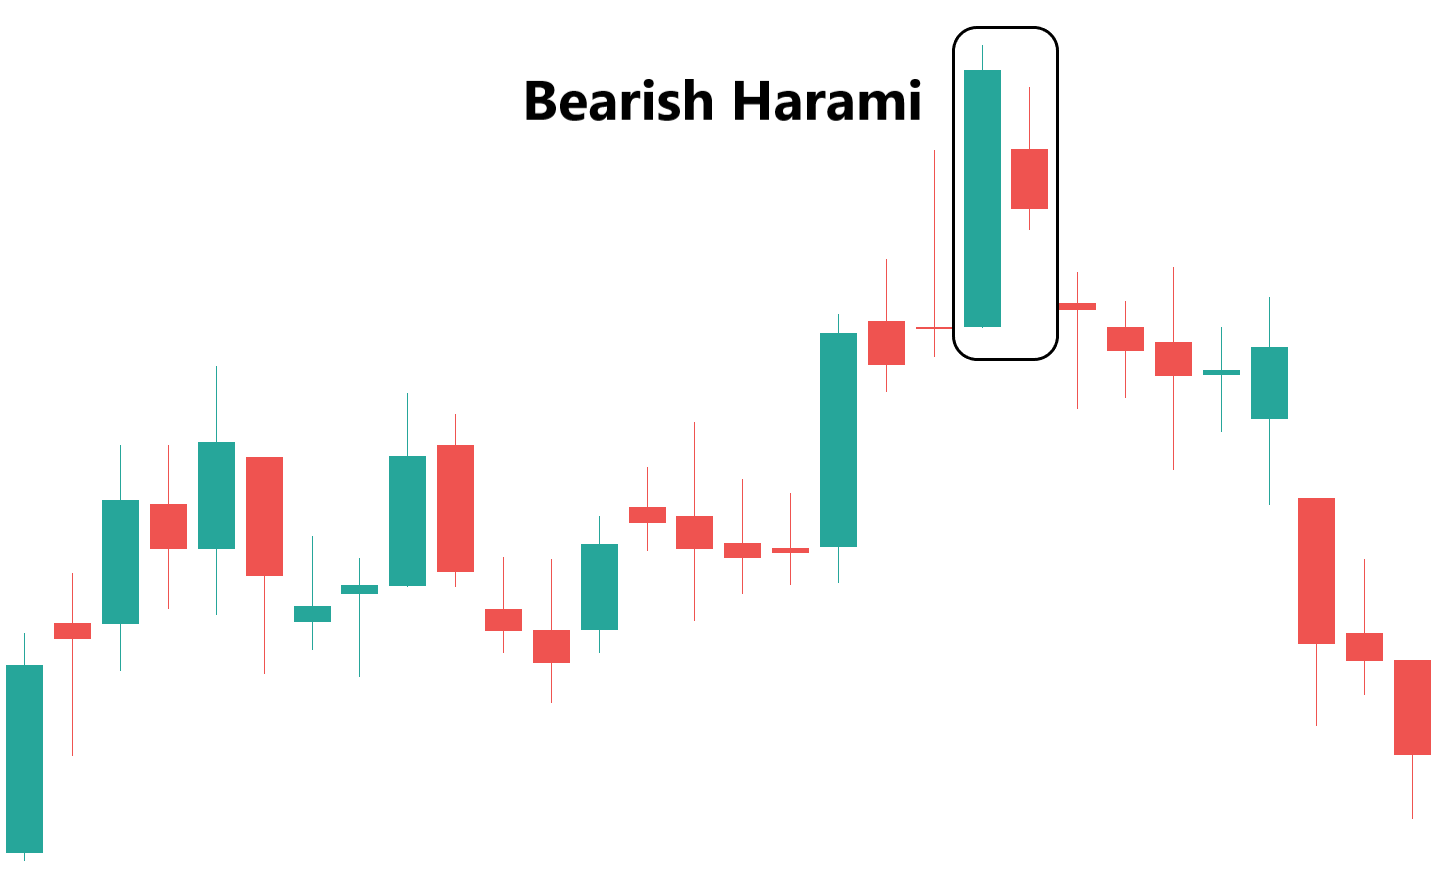
6. Bearish Harami
Structure: A small bearish candle fully contained within the prior larger bullish candle’s body.
Why it matters: Signals loss of momentum by buyers; the smaller body indicates indecision leaning to sellers.
How to trade it: Look for confirmation (lower close) and combine with resistance or overbought indicators.
7. Tweezer Top
Structure: Two (or more) candles with roughly equal highs, often following an uptrend; the second candle is bearish.
Why it matters: Shows repeated failure to push price higher a potential short-term top.
How to trade it: Use as a reversal hint near resistance. Confirmation is crucial.
Confirmation and context — never trade a pattern alone
Candlestick patterns are probabilistic. Improve reliability by combining them with:
- Trend context: Patterns that reverse an uptrend carry more weight than those in a sideways market.
- Support and resistance: A bearish pattern at a known resistance level is stronger.
- Volume: Higher selling volume on the bearish candle increases conviction.
- Indicators: RSI divergence, MACD crossovers, or moving average resistance can add confirmation.
- Timeframe alignment: Patterns on higher timeframes (daily, weekly) are more significant than those on low timeframes.
Practical entry, stop, and target rules
- Entry: Wait for confirmation a close below the pattern (next candle) or a break of a nearby support level.
- Stop-loss: Place above the pattern’s high (or above a recent swing high). Keep risk per trade reasonable (e.g., 1–2% of account equity).
- Targets: Use support levels, Fibonacci retracements, or risk–reward ratios (1:2, 1:3). Consider scaling out: take partial profit at first support and trail the rest.
Example trade setup (simple)
- Identify a bearish engulfing after a clear uptrend near resistance.
- Wait for the next candle to close lower (confirmation).
- Enter short at the close or on a small pullback.
- Place stop above the engulfing high.
- Set initial profit target at nearest support; trail stop if price continues downward.
Common mistakes to avoid
- Trading every pattern without context leads to many false signals.
- Ignoring volume a bearish candle on low volume may be weak.
- Not waiting for confirmation acting on the pattern alone increases risk.
- Using patterns in isolation from macro or fundamental news that can overpower technical signals.
When bearish patterns are less reliable
- In choppy, sideways markets where false reversals are common.
- During major news events news can invalidate technical patterns quickly.
- When volume is very low price moves may be illiquid and misleading.
Final thoughts
Bearish candle patterns are useful tools for spotting potential reversals and timing trades. Their strength grows when combined with trend analysis, support/resistance, volume, and other technical indicators. Treat them as one part of a disciplined trading plan use confirmations, manage risk, and accept that no pattern is correct every time.