Introduction
Installing a 3 way switch wiring diagram pdf might seem daunting at first, but with the right wiring diagram and clear instructions, this electrical project becomes manageable for most DIY enthusiasts. A 3-way switch allows you to control a single light fixture from two different locations perfect for stairways, hallways, or large rooms where convenient lighting control is essential.
This comprehensive guide walks you through everything you need to know about 3-way switch wiring, from understanding the basic components to troubleshooting common problems. By the end of this article, you’ll have the confidence to tackle this electrical project safely and effectively. We’ve also included a downloadable PDF diagram that you can reference during your installation.
Before beginning any electrical work, remember that safety comes first. If you’re uncomfortable working with electrical systems or if your local codes require professional installation, don’t hesitate to contact a licensed electrician.
Understanding 3-Way Switches and Their Applications
A 3-way switch differs significantly from a standard single-pole switch. While a regular switch simply turns a light on or off from one location, a 3 way switch wiring diagram pdf works in conjunction with another 3-way switch to control the same light fixture from two separate locations.
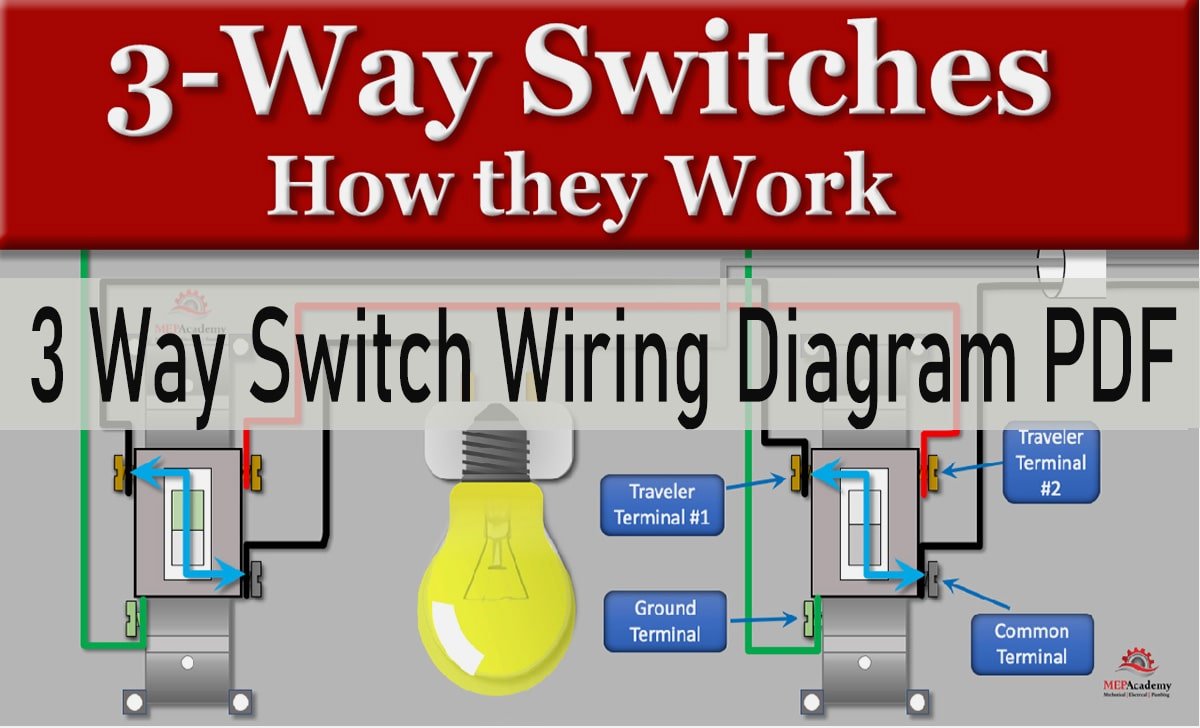
The term “3-way” refers to the three terminals on each switch: one common terminal and two traveler terminals. These switches don’t have traditional “on” and “off” positions. Instead, they work together to complete or break the circuit path, allowing either switch to turn the light on or off regardless of the other switch’s position.
Common applications for 3-way switches include:
Stairways: Control lights from both the top and bottom of the stairs for safety and convenience.
Long hallways: Turn lights on when entering from either end and off when exiting.
Large rooms: Control overhead lighting from multiple entry points.
Bedrooms: Operate lights from both the door and bedside for comfort.
Garages: Control lighting from both the house entrance and the main garage door.
Understanding these applications helps you determine whether 3-way switches are the right solution for your lighting needs.
Essential Tools and Materials for 3-Way Switch Installation
Gathering the proper tools and materials before starting your project ensures a smooth installation process. Having everything on hand prevents unnecessary trips to the hardware store and helps maintain focus on safety.
Required Tools
Wire strippers: For removing insulation from electrical wires cleanly and safely.
Voltage tester: Essential for confirming power is off before beginning work.
Screwdrivers: Both Phillips head and flathead in various sizes.
Wire nuts: For secure wire connections that meet electrical codes.
Electrical tape: Provides additional insulation for wire connections.
Flashlight or headlamp: Illuminates work areas when power is turned off.
Needle-nose pliers: Helpful for bending and positioning wires in tight spaces.
Required Materials
Two 3-way switches: Ensure they’re rated for your circuit’s amperage and voltage.
14-gauge or 12-gauge electrical wire: Match the existing circuit wire gauge.
Wire nuts: Various sizes to accommodate different wire combinations.
Electrical boxes: If replacing existing switches, verify boxes are properly sized.
The wire gauge depends on your circuit’s amperage rating. Most residential lighting circuits use 14-gauge wire for 15-amp circuits or 12-gauge wire for 20-amp circuits. Check your circuit breaker to determine the correct amperage.
Step-by-Step 3-Way Switch Wiring Diagram Explanation
Understanding the wiring diagram is crucial for successful installation. The key to 3 way switch wiring diagram pdf lies in properly identifying and connecting the common and traveler wires.
Wire Identification
Hot wire (black): Carries power from the electrical panel to the first switch.
Neutral wire (white): Completes the circuit back to the electrical panel.
Traveler wires (red and black): Connect the two 3-way switches together.
Ground wire (green or bare copper): Provides safety grounding for the entire circuit.
Basic Wiring Configuration
The most common 3-way switch wiring method involves running power to the first switch, then to the light fixture, and finally to the second switch. Here’s how the connections work:
First switch connections: The hot wire from the panel connects to the common terminal (usually marked “COM” or colored differently). The two traveler wires connect to the remaining terminals.
Between switches: A 3-wire cable carries the two traveler wires and a neutral wire between the switches.
Second switch connections: The two traveler wires connect to the traveler terminals, while the common terminal connects to the hot wire leading to the light fixture.
Light fixture connections: The neutral wire connects directly to the fixture’s neutral, while the hot wire from the second switch connects to the fixture’s hot wire.
Alternative Wiring Methods
Depending on your home’s existing wiring, you might encounter variations of this basic setup. Some configurations run power to the light fixture first, then branch out to both switches. While the connections differ slightly, the fundamental principle remains the same: the traveler wires allow both switches to control the same light.
Critical Safety Precautions and Best Practices
Electrical work requires strict adherence to safety protocols. These precautions protect you from injury and ensure your installation meets safety standards.
Before Starting Work
Turn off power: Switch off the circuit breaker controlling the switches you’re working on.
Test for power: Use a voltage tester to confirm power is off at each switch location.
Post a warning: Place tape over the circuit breaker to prevent accidental restoration of power.
Check local codes: Verify whether your local building codes require permits or professional installation.
During Installation
Work in good lighting: Use a flashlight or battery-powered work light when power is off.
Handle one wire at a time: This prevents confusion and potential short circuits.
Secure wire connections: Ensure all wire nuts are tight and no bare copper is exposed.
Maintain proper wire length: Leave enough wire in the box for future maintenance but avoid overcrowding.
After Installation
Double-check connections: Verify each wire is connected to the correct terminal before restoring power.
Test the circuit: Turn the power back on and test both switches to ensure proper operation.
Install switch plates: Secure the switches in their boxes and install cover plates.
Remember that electrical codes exist for safety reasons. If you’re unsure about any aspect of the installation, consult a licensed electrician.
Troubleshooting Common 3-Way Switch Issues
Even with careful installation, problems can occur. Understanding common issues and their solutions helps you diagnose and fix problems quickly.
Light Won’t Turn On
Check power supply: Verify the circuit breaker hasn’t tripped and power is reaching the first switch.
Inspect wire connections: Loose connections are a common cause of non-functioning switches.
Test the light bulb: Sometimes the simplest explanation is the correct one.
Verify neutral connections: Ensure the neutral wire path is complete from panel to fixture.
Light Won’t Turn Off
Check traveler wire connections: Incorrectly connected traveler wires can cause this issue.
Verify common terminal connections: The common terminals must be connected to the hot wires, not travelers.
Inspect switch quality: Occasionally, a defective switch can cause persistent problems.
Switches Work Intermittently
Tighten wire connections: Loose connections cause intermittent operation and potential fire hazards.
Check wire condition: Damaged insulation or broken wires can cause sporadic problems.
Verify switch compatibility: Ensure both switches are true 3-way switches, not single-pole switches.
Lights Flicker
Examine all connections: Flickering often indicates loose wire connections somewhere in the circuit.
Check wire gauge compatibility: Undersized wires can cause voltage drops and flickering.
Inspect the fixture: Sometimes the problem lies with the light fixture itself, not the switches.
Downloadable PDF Wiring Diagram Resource
To support your installation project, we’ve created a comprehensive PDF diagram that illustrates proper 3-way switch wiring. This resource includes multiple wiring scenarios, color-coded diagrams, and step-by-step visual instructions.
The PDF contains:
Standard 3-way switch diagram: The most common residential wiring configuration.
Alternative wiring methods: Diagrams for different house wiring situations.
Troubleshooting flowchart: Visual guide for diagnosing common problems.
Safety checklist: Essential safety steps to follow during installation.
Wire identification guide: Clear illustrations of different wire types and their purposes.
Having a printed diagram on hand during installation prevents the need to repeatedly reference your phone or computer, allowing you to focus on the work safely. The PDF format ensures the diagrams remain clear and readable even when printed in black and white.
Download this valuable resource before starting your project to ensure you have all the information needed for successful installation.
Frequently Asked Questions
Can I replace a single-pole switch with a 3-way switch?
Converting from single-pole to 3-way switching requires running additional wiring between the two switch locations. This typically involves installing a 3-wire cable to carry the traveler wires between switches. The project’s complexity depends on your home’s construction and accessibility of the wire paths.
Do both switches need to be 3-way switches?
Yes, controlling a light from two locations requires two 3-way switches. You cannot use a single-pole switch with a 3-way switch in this configuration. Both switches must be genuine 3-way switches with the proper terminal configuration.
What’s the difference between 3-way and 4-way switches?
While 3-way switches control lights from two locations, 4-way switches are used when you need control from three or more locations. A 4-way switch is installed between two 3-way switches and has four terminals instead of three.
Can I install dimmer switches in a 3-way configuration?
Yes, but you need special 3-way dimmer switches. Standard dimmer switches won’t work in 3-way applications. Typically, you’ll install one 3-way dimmer switch and one regular 3-way switch, though some manufacturers make compatible dimmer pairs.
Why do my 3-way switches feel different from regular switches?
3-way switches don’t have distinct “on” and “off” positions like single-pole switches. The switch position that turns the light on changes depending on the other switch’s position. This is normal behavior for properly functioning 3-way switches.
Master Your Home’s Lighting Control
Installing 3-way switches transforms how you interact with your home’s lighting, providing convenience and safety benefits that make the project worthwhile. With proper planning, the right tools, and careful attention to safety, this electrical upgrade is achievable for most DIY enthusiasts.
Remember that successful electrical work depends on understanding the principles behind the wiring, not just following diagrams blindly. Take time to understand why each wire connects where it does, and you’ll be better equipped to troubleshoot any issues that arise.
Before beginning your installation, download our comprehensive PDF diagram and review all safety procedures. If you encounter unexpected wiring situations or feel uncertain about any aspect of the project, don’t hesitate to consult with a licensed electrician. The small cost of professional guidance is insignificant compared to the importance of electrical safety.
Start planning your 3-way switch installation today, and enjoy the improved lighting control and convenience these switches bring to your home.